Gmail API
Today ကျနော် email တေကို gmail api ကနေ လှမ်းဖတ်မယ့် အကြောင်းလေး sharing လုပ်ပေးချင်ပါတယ်။ Gmail API ကတော့ gmail feature ကို application မှာထည့်သုံးလို့ရအောင် လုပ်ပေးပါတယ်။ Integration လုပ်တဲ့အခါ process တခုပီးလို့ progress တခုအနေနဲ့ mail ပို့ပီး notify လုပ်တာ သို့ email ကနေ information တခုခု လိုချင်တဲ့အခါမျိးမှာ သုံးတတ် ကြပါတယ်။ ပထမဆုံး အဆင့် အနေနဲ့ Gmail API နဲ့တွဲအလုပ်လုပ်နိုင်ဖို့ client secret key ရှိရပါမယ်။ အောက်မှာ key ထုတ်ပုံအဆင့်ဆင့် ကို လေ့လာကြည့်ပါ့မယ် ခင်ဗျာ။
Generating client credentials to access GMAIL API
google developer console မှာ ကျနေယ် စမ်းမယ့် integration program အတွက် project အရင်ဆောက်ကပါတယ်။ please click /SELECT/+NEW PROJECT

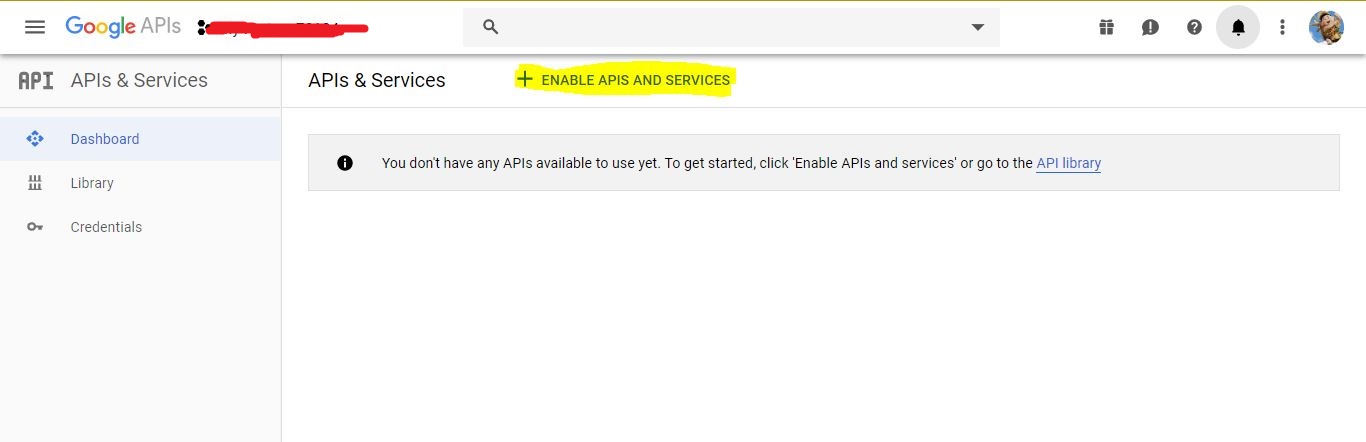
အဲ့နောက် Gmail API service ကိုထည့်ဖို့ + ENABLE APIS AND SERVICES ကိုသွားပါတယ်။
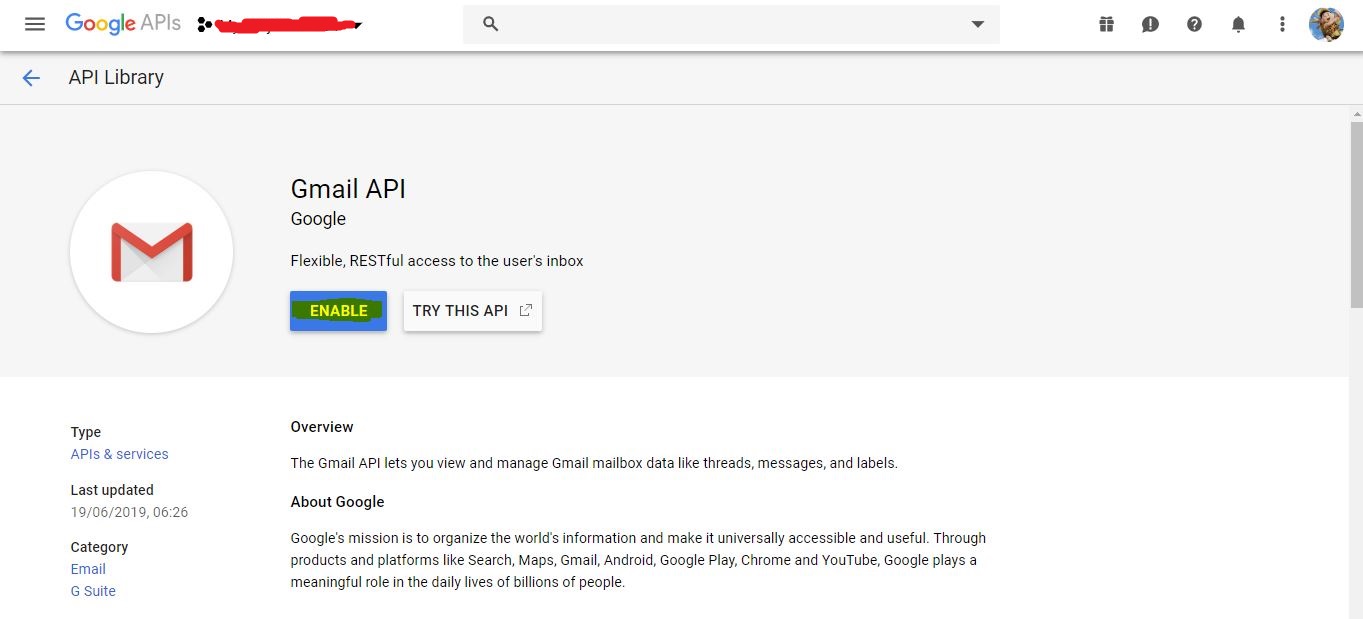
ပီးတော့ Gmail API ကို ENABLE လုပ်ပါတယ်။
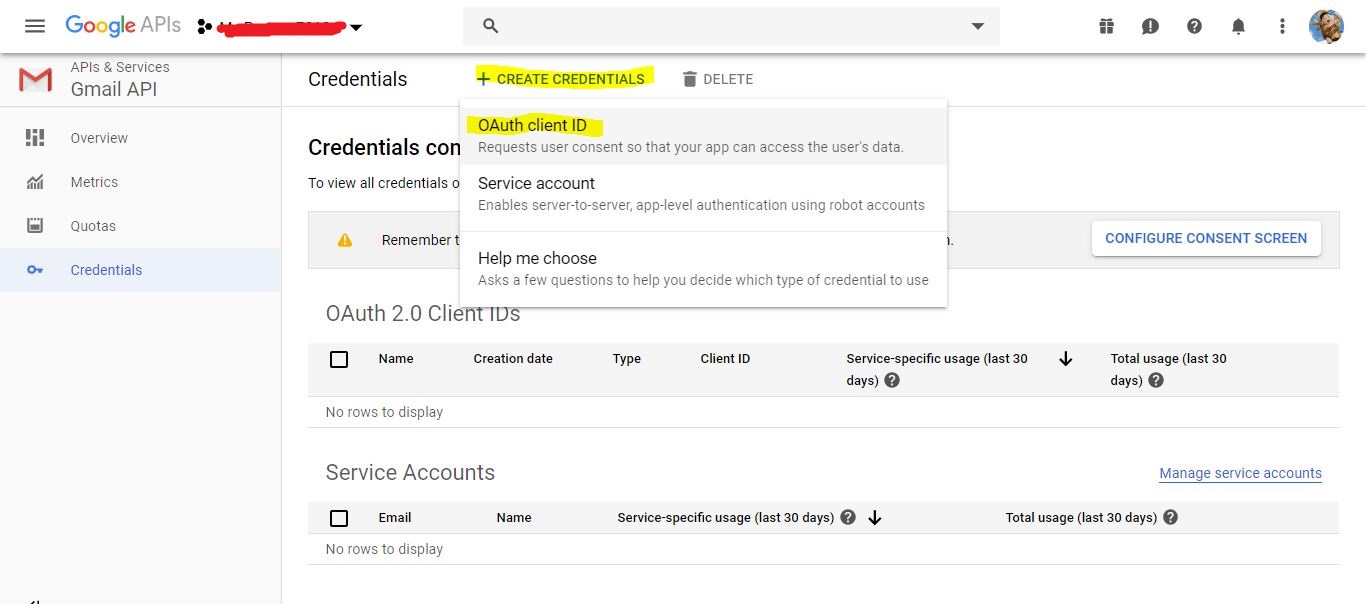
နောက် ကျနော့် Integration program နဲ့လှမ်းချိတ်ဖို့ client secret key ထုတ်ပါတယ်ခင်ဗျာ။ အဲ့ key ကတဆင့် Gmail API ကို authentication လုပ်ပီး ကျနော် လိုချင်တာနေ လှမ်ခိုင်းပါမယ်။ Please click from Credentials Menu/+ CREATE CREDENTI/OAuth client ID
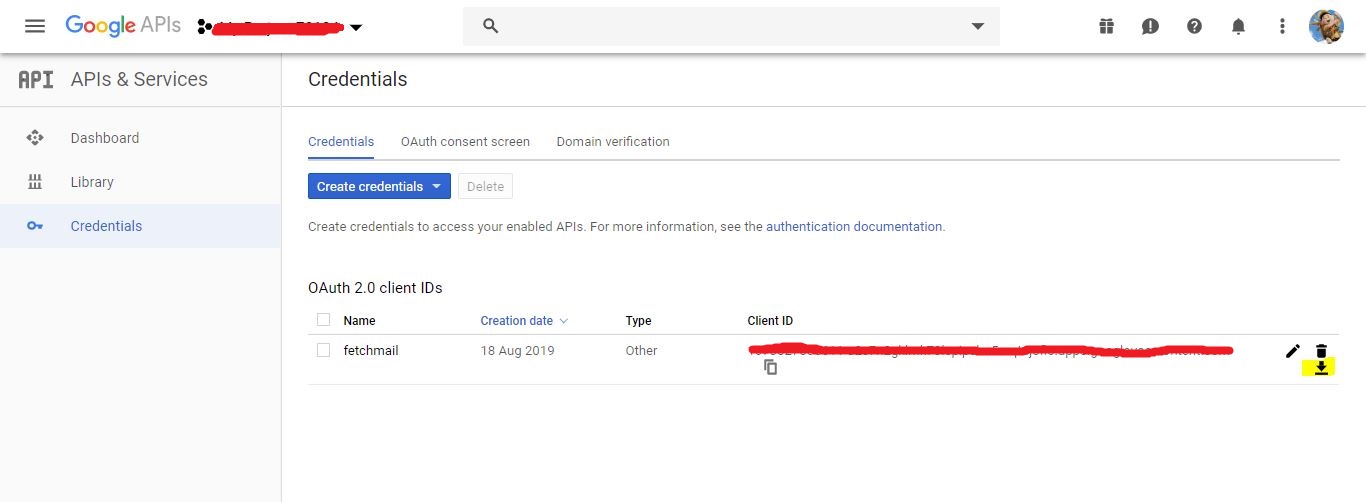
နောက်ဆုံး secret key ကို ကျနော့် program execute လုပ်မယ့် folder ထဲ ပီး ထားပါတယ်။ သို့ သီးသန့် path ထားပီး program ကနေ လှမ်းချိတ်တဲ့အခါ file path ပေးပီး ချိတ်လို့လည်းရပါတယ်ခင်ဗျ။
Connecting with Python
Program စမရေးခင် လိုအပ်တဲ့ python libraires တေကျနော် install လုပ်ပါမယ်။
1
$ pip install --upgrade google-api-python-client google-auth-httplib2 google-auth-oauthlib json
ကျနော့် client_secriet.json ကို token.son လို့ rename လုပ်ထားပါတယ်။ အရင် ကျနော် အောက်က code နဲ့ Gmail API ကို ချိတ်ကြည့်ပါမယ်။ code ထဲမှာ ‘https://www.googleapis.com/auth/gmail.modify’ url ကို လှမ်းချိတ်ပါ ခုနက ကျနော် download လုပ်ထားတဲ့ rename လုပ်ထားတဲ့ token.json key file သုံးပီး authentication လုပ်ပါဆို ပီး ရေးထားပါတယ်။ Netme.py
1
2
3
4
5
6
7
8
from googleapiclient.discovery import build
from httplib2 import Http
from oauth2client import file, client, tools

SCOPES = 'https://www.googleapis.com/auth/gmail.modify'
store = file.Storage('token.json')
creds = store.get()
GMAIL = discovery.build('gmail', 'v1', http=creds.authorize(Http()))
Netme.py file လေး run ပီးရင် default browser မှာ google security access တောင်းပါလိမ့်မယ်ခင်ဗျာ။ allow လုပ်ပေးဖို့လိုပါတယ်။ terms and conditions ကို သေချာဖတ်ကြည်ပီး allow မလုပ်ချင်ရင် မလုပ်ပါနဲ့နော်။
ခု ကျနော့် INBOX ထဲက မဖတ်ကသေးတဲ့ mail တေကိုဖတ်ပါမယ်။ ပထမဆုံး INOBX ထဲက မဖတ်ကသေးတဲ့ mail list နဲ့ mail id ကို ဆွဲထုတ်ပီး mssg_list ထဲ list အနေနဲ့ထည့်ထားပါတယ်။
1
2
3
4
5
6
7
8
user_id =  'me'
label_id_one = 'INBOX'
label_id_two = 'UNREAD'

unread_msgs = GMAIL.users().messages().list(userId='me',labelIds=[label_id_one, label_id_two]).execute()

mssg_list = unread_msgs['messages']
print ("Total unread messages in inbox: ", str(len(mssg_list)))
API output အရ ကျနော့်မှာ unread mail နှစ်ဆောင်ရှိပါတယ်။
1
2
3
4
5
6
7
8
9
10
11
12
13
14
15
16
17
18
{
 "messages": [

First mail

  {
   "id": "xxxxxxxxxxxxxxxx",
   "threadId": "xxxxxxxxxxxxxxxx"
  },

Second mail
  {
   "id": "xxxxxxxxxxxxxxxx",
   "threadId": "xxxxxxxxxxxxxxxx"
  }
 ],
 "resultSizeEstimate": 2
}
ခုနက mssg_list ကို ကျနော် looping ပတ်ပီး mail id တခုချင်းစီယူပါမယ်။ user id နဲ့ mail id ယူပီး get ခါ်လိုက်ရင် json format နဲ့ mail data ရပါလိမ့်မယ်။ အဲ့ထဲကမှ payload field ရဲ့header key ထဲမှာရှိပါတယ်။
1
2
3
4
5
6
for mssg in mssg_list:
       temp_dict = { }
       m_id = mssg['id']
       message = GMAIL.users().messages().get(userId=user_id, id=m_id).execute()
       payld = message['payload']
       headr = payld['headers']
API output
1
2
3
4
5
6
7
8
9
"payload": {
  "partId": "",
  "mimeType": "multipart/alternative",
  "filename": "",
  "headers": [
   {
    "name": "Delivered-To",
    "value": "[email protected]"
   },
နောက် ကျနော် data ယူပါမယ်။ Sender,Subject,Date_Time,Body စသည်ဖြင့်။ Subject က header key ထဲက name key သာ Subject ဖြစ်ခဲ့ရင် value key ထဲက data ယူပီး temp_dict[“Subject”] (dictionary) ထဲကိုထည့်ပါတယ်။
1
2
3
4
5
6
for one in headr:
          if one['name'] == 'Subject':
             msg_subject = one['value']
             temp_dict['Subject'] = msg_subject
          else:
            pass
API output
1
2
3
4
5
6

"headers": [
{
    "name": "Subject",
    "value": "Leave - UL"
},
အလားတူ name key သာ Date ဖြစ်ခဲ့ရင် value key ထဲက data ယူပီး temp_dict[“Date_time”] (dictionary) ထဲကိုထည့်ပါတယ်။ 2019-08-15 10:21:16 format ဝင်အောင် parse function ကိုခေါ်ထားပါပီး temp_dict[‘Date_time’] ထဲထည့်ထားပါမယ်။
1
2
3
4
5
6
7
8
9
for t in headr:
          if t['name'] == 'Date':
             msg_date = t['value']
             date_parse = (parser.parse(msg_date))
             m_date = (date_parse.date())
             m_time = (date_parse.time())
             temp_dict['Date_time'] = str(m_date)+" "+str(m_time)
          else:
             pass
API output
1
2
3
4
5
"headers": [
{
    "name": "Date",
    "value": "Thu, 15 Aug 2019 10:21:16 +0630"
},
Name key က From value ကို temp_dict[‘Sender’] ထဲထည့်ပါတယ်။
1
2
3
4
5
6
for two in headr:
          if two['name'] == 'From':
             msg_from = two['value']
             temp_dict['Sender'] = msg_from
          else:
             pass
API output
1
2
3
4
5
"headers": [
{
    "name": "From",
    "value": "Lillian Phyoe \u[email protected]\u003e"
},
temp_dict[‘body’] ထဲကို snippet value ထည့်ပါတယ်။
1
temp_dict['Body'] = message['snippet']
API output
1
"snippet": "Reason: please, let me take a leave on this day!; Name : khinpyaephyo.san; Emp ID : 01; Leave Type: UL",
နောက်ဆုံး ကျနော်ရဲ့ temp_dict ထဲမှာ Sender,Subject,Date_time,Body ရောက်သွားပီပေါ့နော်။ နောက်ဆုံး ကျနော် json format နဲ့ output ထုတ်ပ့ါမယ်။
1
2
3
Final_list=[]
final_list.append(return_dict)
json_data=json.dumps(final_list)
Output
1
2
3
4
5
6
{
    "body": "Reason: please, let me take a leave on this day!; Name : khinpyaephyo.san; Emp ID : 01; Leave Type: UL",
    "date_time": "2019-08-15 10:21:16",
    "sender": "Lillian Phyoe <[email protected]>",
    "subject": "Leave - AL"
}
Actually I’m not a programmer. There has many requirements. If you don’t mind, please don’t forget to give feedback in comment. Thank you!